Selenium, Python and Jenkins on Debian - 2/3
In our first post on Selenium in Python, we saw how to prepare your continuous integration environment on Debian. Now it's time to have a look on how to add Selenium tests in your existing web project.
Sample project
This tutorial is based on the poll application from the Django tutorial. It describes all the required steps to run Selenium tests on a Django project. The source code can be found here.
This sample project is organized as follow:

The following features are implemented:
- Poll management via the Django admin site,
- Vote submission.

Don't forget to install Django!
pip install Django
Testing tools
To write and execute Selenium tests, the following tools are used:
- nose: an extensible test runner,
- selenose: a package using the Python bindings for Selenium to provide some useful Selenium related plugins for nose,
- djangosanetesting: a set of nose plugins dedicated to Django,
- CherryPy: used by djangosanetesting to start a web server,
- coverage: to enable code coverage reporting.
Install them all by typing:
pip install selenose djangosanetesting CherryPy coverage
Configure tests
The test configuration is located in tests/setup.cfg and will be loaded by nose at runtime:
[nosetests]
with-xunit = true
with-coverage = true
cover-package = djangotutorial,polls
with-django = true
with-cherrypyliveserver = true
with-selenium-server = true
with-selenium-driver = true
with-xunitgenerates test result reports,with-coverageandcover-packagegenerate coverage reports for thedjangotutorialandpollspackages,with-djangoenablesdjangosanetestingwhich setup database for instance,with-cherrypyliveserverstarts a CherryPy server ondjangotutorialfor Selenium tests,with-selenium-serverstarts a Selenium Server,with-selenium-driverprovides a Selenium Web Driver to the tests.
The test database is configured in djangotutorial/settings.py with TEST_DATABASE_NAME (used by djangosanetesting for live server) and TEST_NAME:
TEST_DATABASE_NAME = 'djangotutorialtest.db'
DATABASES = {
    'default': {
        'ENGINE': 'django.db.backends.sqlite3',
        # Other configuration
        # ...
        'TEST_NAME': TEST_DATABASE_NAME,
    }
}
Write tests
Selenium tests are located in the tests folder. Here is a test template:
from selenose.cases import SeleniumTestCase

from djangosanetesting.cases import HttpTestCase

class SampleTestCase(SeleniumTestCase, HttpTestCase):

    def test(self):
        self.driver.get('http://localhost:8000/')
        # Your test here...
This test inherits from:
selenose.cases.SeleniumTestCaseto flag this test as a Selenium test for the Selenium Driver Plugin of selenose (the one providing a Web Driver),djangosanetesting.cases.HttpTestCaseto flag this test as an HTTP test for djangosanetesting, to start the CherryPy server.
Then write tests as usual, with the benefit of having the self.driver directly available.
The following sections contain the test examples of two major features:
- vote submission,
- login on admin site.
Test vote submission
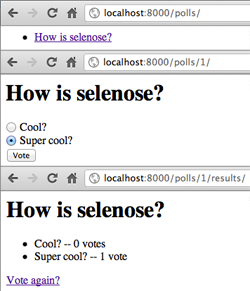
The project defines a sample poll How is selenose? in the djangotutorial/polls/fixtures/initial_data.json fixture which is loaded at database initialization.

This test verifies that the voting process is working for this poll:
class PollsTestCase(SeleniumTestCase, HttpTestCase):

    def test_vote(self):
        self.driver.get('http://localhost:8000/polls/')
        poll = self.driver.find_element_by_link_text('How is selenose?')
        poll.click()
        time.sleep(2)    # Should use accurate WebDriverWait
        choices = self.driver.find_elements_by_name('choice')
        self.assertEquals(2, len(choices))
        choices[1].click()
        choices[1].submit()
        lis = self.driver.find_elements_by_tag_name('li')
        self.assertEquals(2, len(lis))
        self.assertEquals('Cool? -- 0 votes', lis[0].text)
        self.assertEquals('Super cool? -- 1 vote', lis[1].text)
- First open the page listing the polls:
http://localhost:8000/polls/, - Search the link pointing to the
How is selenose?poll, and click on it, - Verify that two choices are available, then select the last one before submitting the form,
- Finally verify the vote results on the poll result page.
Test admin site login
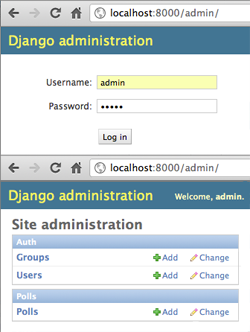
The project also defines an administrator admin/admin in the djangotutorial/polls/fixtures/initial_data.json fixture which is loaded at database initialization.

This test checks that the admin user can log into the admin site:
class AdminTestCase(SeleniumTestCase, HttpTestCase):

    def test_login(self):
        self.driver.get('http://localhost:8000/admin/')
        self.driver.find_element_by_id('id_username').send_keys('admin')
        password = self.driver.find_element_by_id('id_password')
        password.send_keys('admin')
        password.submit()
        time.sleep(2)    # Should use accurate WebDriverWait
        self.assertTrue(self.driver.find_element_by_id('user-tools').text.startswith('Welcome'))
- First open the administration interface login page:
http://localhost:8000/admin/, - Then look for the field dedicated to username (has an id
id_username) and typeadmin, - Then look for the field dedicated to password (has an id
id_password) and typeadminbefore submitting the form, - Finally assert that the user is welcomed.
Run tests
The script tests/run.py is the entry point to run the tests. It:
- Adds
/(folder of the project) and/djangotutorial(forpollsmodule) in thesys.path, - Exports the
DJANGO_SETTINGS_MODULEinos.environto define the Django settings module to use in tests, - Changes the current directory to the
testsfolder, - Call nose.
To run all tests with the firefox Web Driver environment (see selenose documentation for more information on Web Driver environments), execute:
$ python tests/run.py --selenium-driver=firefox
Or to run a single test:
$ python tests/run.py --selenium-driver=firefox test_admin.py
What's next?
In our next blog post, how to integrate this project with Jenkins!