Selenium, Python and Jenkins on Debian - 3/3
In our first post on Selenium in Python, we saw how to prepare your continuous integration environment on Debian. In the second one, we saw how to enable Selenium tests in your existing web project. Now it's time to see how to integrate all this within Jenkins!
Global Configuration
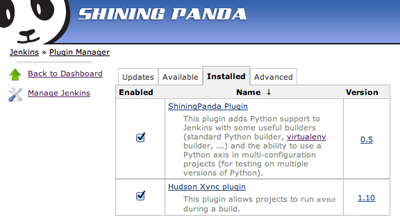
First ensure that the latest version of the ShiningPanda Plugin and Xvnc Plugin are installed (check on Manage Jenkins > Manage Plugins > Installed page). If not, look for them in the Available tab and perform the installation (don't forget to restart Jenkins).
Then declare all the Python installations you want to test on with the Manage Jenkins > Configure System page (one shot configuration):
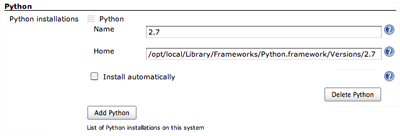
To add an installation, search the Python section and click on Add Python. Then give the installation a name and enter its home folder (ie. PYTHONHOME).
Sample project
This tutorial is based on the sample described in our last post. Our goal is to test the project on several different web browsers, or in this context: Web Driver environments.
Create a new job
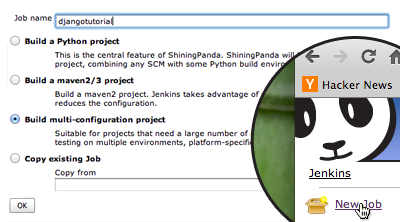
First of all, create a New Job, enter its name (here djangotutorial) and select Build multi-configuration project before validating.
Basic setup
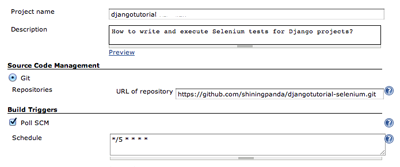
As usual, setup:
- The description.
- The source repository, here
https://github.com/shiningpanda/djangotutorial-selenose.git. - The build trigger policy: checking for modifications every five minutes in this example.
Axis
Axis provide parameters to the build. At least two axis are required for this project:
- The Web Driver one to specify the web browser to use,
- The Python one to specify the Python interpreter running the web server.
Web Driver axis
To create a Web Driver axis, click on Add axis in Configuration Matrix section and select User-defined axis.
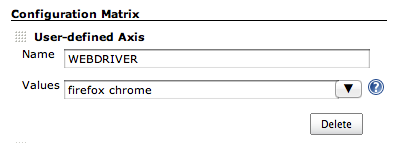
Then:
- In
Namedefine the environment variable that will contains the Web Driver environment to test on, hereWEBDRIVER, - In
Valueswrite a space separated list of Web Driver environment you want to test on, herefirefoxandchrome.
For more informations on Web Driver environments, see selenose documentation.
Python axis
Click once more on Add axis and select Python to be able to select the Python interpreter running the web server.
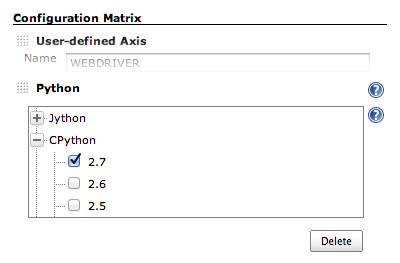
In this example, only Python 2.7 is tested but feel free to add additional interpreters.
Start a display
A display is required to run Selenium tests.

To start one, enable Run Xvnc during build in the Build Environment section.
Builder
To be able to install all required package, a Virtualenv Builder is recommended.
Click on Add build step in Build section and select Virtualenv Builder.
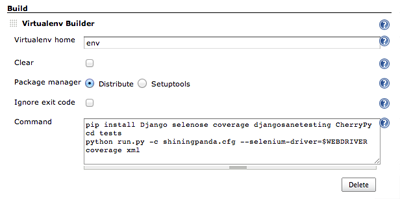
In the Command field enter all required steps:
- Install dependencies with pip,
- Step in
testsfolder, - Run the tests using the script
run.py(a nose wrapper) without forgetting to specify the Web Driver to use with the--selenium-driver=option (note that its value$WEBDRIVERcomes from the axis defined previously), - Convert code coverage report in XML.
Post-build actions
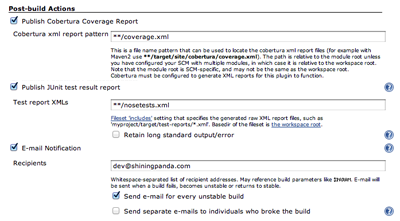
Add all the desired post-build actions. Here Jenkins is asked to parse the XML test and coverage reports and to send mails on failure.
Results

Finally start a new build by clicking on Build Now: execution results by Web Driver environment are directly available on the main page of the project.
Tips
Testing on multiple Web Driver environments can be time and resource consuming.
To ensure that a revision is worthwhile to test on all environments, you can execute a touchstone build first:
- If this build is successful, builds on other versions will be triggered.
- If this build fails, other versions will not be tested.

To enable this option, look for a Execute a touchstone build first checkbox in the Configuration Matrix and check it.
The syntax for filter is WEBDRIVER=="<environment>", where <environment> is the name of the Web Driver environment you want to test on first.
Here the touchstone build is executed with Firefox (WEBDRIVER=="firefox") but it could also have been Chrome (WEBDRIVER=="chrome").